인터넷 네트워크인터넷과 네트워크는 일상생활에서도 많이 쓰는 용어이지만, 내부 동작 원리나 개념에 대해서 아는 것은 부끄럽지만 전무했다. 그래서 이번에 세미나를 준비하면서 공부하고 배우고 이해한 것들 것 정리하고자 한다. 인터넷과 네트워크는 굉장히 광범위한 주제이지만, 아래와 같이 나눠서 설명할 것이다. http프로토콜에 대해서는 따로 다룰 예정이다.
<인터넷 네트워크>
- 인터넷과 네트워크란?
- IP
- TCP/UDP
- PORT
- DNS
- 네트워크 계층
인터넷과 네트워크란?
먼저 이 둘의 정의를 알아보자.
인터넷은 전 세계의 컴퓨터들이 서로 연결되어 있는 아주 거대한 네트워크를 말한다.
그럼 네트워크는 뭘까?
네트워크는 데이터를 교환하기 위해 전송매체를 매개로 서로 연결되어 있는 것이다.
IP(internet protocol)
IP를 직역하면 인터넷 통신규약을 말한다. 그리고 정의는 다음과 같다.
컴퓨터들이 서로를 인식하고 통신을 하기 위해서 사용하는 특수한 번호, 주소를 ip라고 한다.
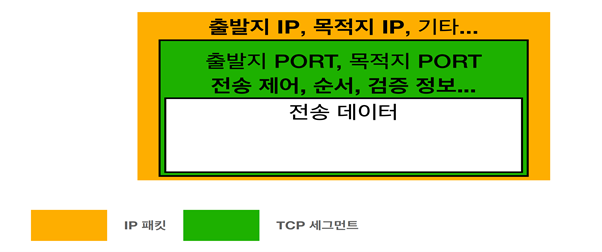
IP의 역할은 컴퓨터 간의 데이터 전달이다. 그래서 패킷(packet: package + bucket 의 합성어)이라는 통신 단위로 데이터를 전달한다. ip패킷에는 출발지ip와 목적지ip, 그리고 전송데이터가 담겨있다.
 <출처: 김영한 ‘모든 개발자를 위한 HTTP 웹 기본 지식’ 인프런 강의 자료>
그러나 IP로 데이터를 전달하는 것에는 한계점들이 존재한다.
첫 번째, 비연결성이다. 클라이언트가 서버로 데이터를 보낼 때, 서버가 데이터를 받을 수 있는 상태인지 모르고 보낸다. 즉, 서버가 데이터를 못 받을 수도 있다는 것이다.
두 번째, 비신뢰성이다. 클라이언트가 서버로 데이터를 보내는 과정에서, 중간에 패킷이 소실되거나 패킷이 순서대로 오지 않는 경우가 발생할 수도 있다.
그리고 이런 한계점들을 보완하기 위해 등장한 것이 바로 TCP이다.
TCP/UDP
TCP
TCP는 transmission control protocol의 약자로, ‘전송 제어 프로토콜’ 이라고 부른다. 이는 신뢰할 수 있는 프로토콜이며 대부분 사람들이 사용한다. 웹, 이메일, 파일전송 등 정확한 데이터 전달에 쓰인다.
Tcp는 3가지 중요한 특징을 가진다.
- 데이터를 보낼 때 순서가 보장된다 즉, ip의 비신뢰성 문제를 해결해준다.
- 데이터를 보낼 때 전달을 보증한다. 즉, ip의 비연결성 문제를 해결해준다.
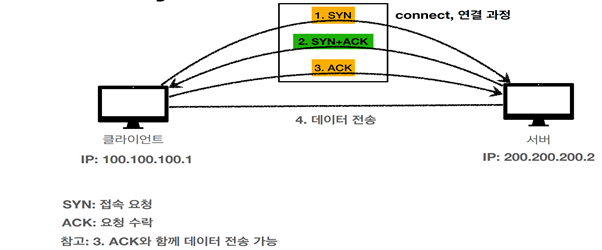
- 3 way handshake(가상 연결)
마지막 3 way handshake에 대해 알아보자.
클라이언트와 서버가 데이터 전송이 가능한 상태가 되기 위해서는, 3가지 과정을 거친다.
첫 번째, 클라이언트가 접속 요청하는 SYN(synchronize) 패킷을 서버에 보낸다.
두 번째, 서버가 클라이언트에게 요청을 수락하는 ACK(acknowledge)와 클라이어트에 연결 요청하는 SYN을 보낸다.
마자막, 클라이언트가 서버의 요청을 수락하는 ACK를 서버에게 보낸다.
이 과정은 마치 서버와 클라이언트가 다음과 같이 대화하는 것으로 비유할 수 있다.
Step1) 클라이언트: 서버야, 내 말 들리냐(SYN)?
Step2) 서버: 응. 잘 들려(ACK), 넌 내 말 들려(SYN)?
Step3) 클라이언트: 응 잘 들려(ACK).
 <출처: 김영한 ‘모든 개발자를 위한 HTTP 웹 기본 지식’ 인프런 강의 자료>
그래서 3단계를 거치면 데이터 전송이 가능해지고, 마지막 단계와 동시에 데이터를 전달하기도 한다.
TCP의 헤더 혹은 통신단위는 세그멘트이다. IP가 패킷이라면, TCP는 세그멘트이다. 세그멘트에는 출발지 PORT, 목적지 PORT, 그리고 전송제어, 순서, 검증 정보 등을 담고 있으며, 세그멘트 내에는 메시지 바디를 감싸고 있다. 여기서 새로운 용어가 등장한다. PORT는 무엇인가..? 먼저, UDP 알아보고 살펴보자..
 <출처: 김영한 ‘모든 개발자를 위한 HTTP 웹 기본 지식’ 인프런 강의 자료>
UDP
UDP는 user datagram protocol으로, 사용자 데이터그램 프로토콜이다. Tcp의 3가지 특징을 가지고 있지 않으며, 데이터를 일방적으로(단방향) 보낸다.
이 친구의 장점은 단순하고 빠르다는 것이다. 그래서 http/3버전은 UDP를 기반으로 하였다.
EX) 음악, 동영상 스트리밍 서비스
PORT
포트는 같은 IP내에서 프로세스를 구분하는 것을 말한다.
0번에서 65535번까지 할당이 가능하며, 잘 알려진 WELL-KNOWN 포트는 0번 1023번이다. 참고로, HTTP는 80번, HTTPS는 443번이다.
DNS는 클라이언트에게는 너무나도 고마운 존재이다. 왜냐하면 기존의 IP는 100.100.100.1 처럼 길고 숫자들을 모두 기억하기도 힘들다. 그 뿐만이 아니다. IP주소는 변경될 수도 있다. DNS는 위 불편함을 다 해결해준다. DNS는 www.naver.com이나 www.google.com 같은 것이다.
비유하자면, ip가 010-xxxx-xxxx라면, DNS는 앞 전화번호를 등록한 전화번호부이다. DNS서버에서 알아서 IP변경을 관리해주며, 클라이언트에서 DNS를 요청하면 DNS서버에서 DNS에 매치되는 IP를 클라이언트로 보내준다.
네트워크 계층(OSI 7계층과 TCP/IP 4계층)
<OSI(open systems interconnection) 7계층>| 계층 | 내용 |
|---|
| 7계층 application layer응용 계층 | http, DNS, FTP 등 프로토콜, 사용자가 네트워크 접근해주는 계층 |
| 6계층 presentation layer 표현 계층 | 확장자나 인코딩 포함, 데이터를 정해진 표현 형태로 변환 |
| 5계층 session layer 세션 계층 | 포트 연결, ssh 등 프로토콜 포함, 포트 번호기반 통신 쎄션 구성 |
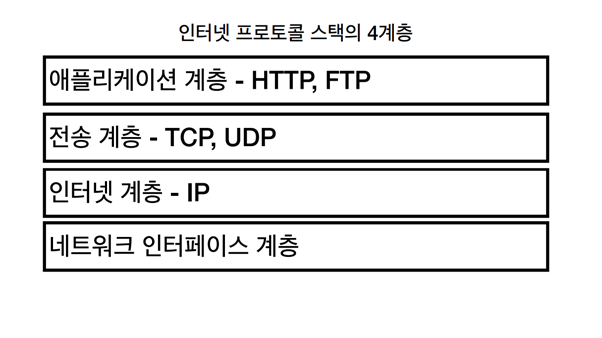
| 4계층 transport layer 전송계층 | TCP, UDP프로토콜 |
| 3계층 network layer 네트워크 계층 | IP프로토콜 |
| 2계층 datalink layer 데이터 링크 계층 | MAC어드레스간 주소 접근담당 |
| 1계층 physical layer 물리 계층 | 네트워크 하드웨어 전송기술 |
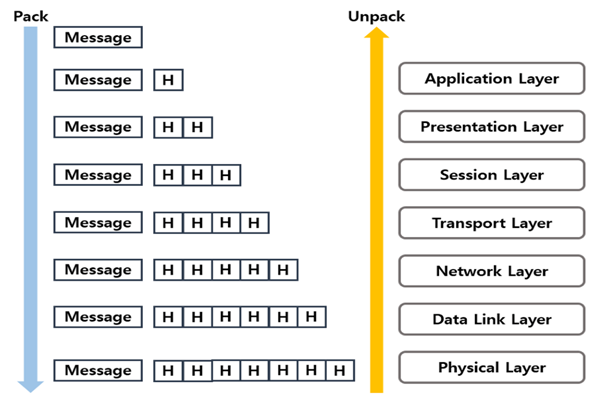
OSI 각 계층 통과법:
 <출처: 김영한 ‘모든 개발자를 위한 HTTP 웹 기본 지식’ 인프런 강의 자료>
메시지를 네트워크 전송 시에는 계층을 내려가면서 header를 추가한다.
네트워크로부터 메시지를 전송 받을 때에는, 아랫 계층부터 위로 올라오면서 차례대로 header를 분석해서 최종적인 메시지를 받는다.
<TCP/IP 4계층>
 <출처: 김영한 ‘모든 개발자를 위한 HTTP 웹 기본 지식’ 인프런 강의 자료>
HTTP
이제 HTTP에 대해 알아볼 것이다. 기본적이고 중요한 내용을 요약해서 정리할 것이다. URI에 대한 개념도 알아두면, 좋을 것 같아서 목차에 넣긴 했다..
- URI
- HTTP와 그 특징
- HTTP 메시지
- HTTP 메서드
- HTTP STATUS
URI
URI는 Uniform Resource Identifier 의 약자로 리소스를 식별하는 통일된 방식을 말한다. URI는 URL과 URN을 포괄하는 개념이라고 생각하면 된다. 우리에게 친숙한 URL은 리소스가 있는 위치를 지정하고, URN은 리소스에 이름을 부여한다. 후자는 거의 쓰지 않는다고 한다. URI는 URL이다. 그러나 URL은 URI가 아니다.
다음은 URL의 예시이다.
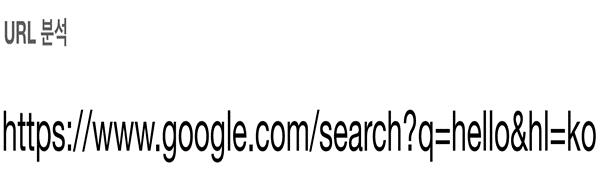 <출처: 김영한 ‘모든 개발자를 위한 HTTP 웹 기본 지식’ 인프런 강의 자료>
https는 프로토콜을 의미하고, 호스트명은 www.google.com 이다. 포트번호는 443번이지만 현재 생략된 상태이다. ‘/search’는 path를 의미한다. 그리고 ‘?q=hello&hl=ko’는 쿼리스트링, 쿼리 파라미터를 의미한다.
HTTP와 그 특징
HTTP(hypertext transfer protocol)는 웹에서 정보를 주고 받을 수 있는 프로토콜이다. 그리고 거의 모든 것을 전송 할 수 있다. html문서, text문서, 이미지, 음성, 영상, JSON, XML 등 거의 모든 형태의 데이터를 전송 가능하다.
http버전은 0.9를 시작으로 1.0, 1.1, 2, 3 등 다양한데, 우리가 가장 많이 사용하고 중요한 버전은 1997년에 만들어진 1.1버전이다.
특징은 크게 3가지로 볼 수 있다.
Client server 구조이다.
Request-response 구조로, 클라이언트는 서버에 요청을 보내고 응답을 대기하며, 서버는 요청에 대한 결과를 만들어서 응답한다.
무상태 프로토콜 (stateless)
서버가 클라이언트의 상태를 보존하지 않는 것이 무상태이다. 서버 확장성을 높일 수 있다는 장점이 있으며, 단점이 있다면 클라이언트가 추가로 데이터를 많이 전송해야 한다는 것이다. 상태를 기억하는 방법도 존재한다. 브라우저 쿠키와 쎄션을 이용하는 것이다.
정리하면, 서버가 클라이언트가 이전에 요청한 결과에 대해 까먹는 것이라고 생각하면 된다.
비 연결성
클라이언트 요청 -> 서버 응답 -> tcp/ip 연결 종료
위 단계에서 말하고자 하는 것은 서버가 응답을 준 이후에, tcp/ip 연결을 종료한다는 것이다. 이는 서버 자원을 효율적으로 사용 할 수 있다는 장점이 있다.
일단 기본적인 http메시지 구조는 아래와 같다.
- Start-line
- Header: http 전송에 필요한 모든 부가정보
- Empty line(공백)
- Message body: 실제 전송할 데이터
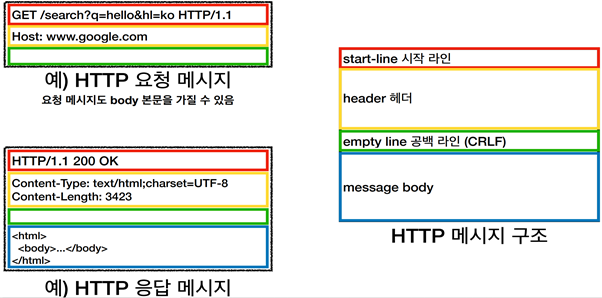 <출처: 김영한 ‘모든 개발자를 위한 HTTP 웹 기본 지식’ 인프런 강의 자료>
HTTP 메서드
여러가지 종류가 있다. 그러나 중요한 것, 많이 쓰는 것 위주로 정리해서 GET, POST, PUT, PATCH, DELETE 5가지를 볼 것이다.
GET METHOD
리소스를 조회하는 메서드이다.
POST METHOD
요청 데이터를 처리하는 메서드이다. 메시지 바디를 통해 서버로 요청 데이터를 전달하고 서버는 요청 데이터를 처리한다. 신규 리소스 등록이나 프로세스 처리사용 등에 쓰인다. 다른 메서드로 처리하기 애매한 경우에도 사용 할 수 있어서 만능 메서드이기도 하다.
PUT METHOD
리소스를 완전히 대체하는 메서드이다. ‘완전히’ 라는 말에 주목해야 한다. 폴더에 파일을 덮어쓰는 것이라 생각하면 편하다. 리소스가 있으면 기존의 리소스 날라가고 새로운 리소스로 완전히 대체한다. 리소스가 기존에 없다면, 그냥 새로운 리소스가 등록되는 것이다.
PATCH METHOD
그렇다면 부분적으로 리소스를 변경할 때에는 어떻게 해야할까? 이 경우에는 PUT이 아닌 PATCH 메서드를 사용하면 된다. PATCH 메서드는 리소스를 부분적으로 변경하는 메서드이다.
DELETE METHOD
직역 그대로 그냥 리소스를 제거하는 메서드이다.
첫 번째, 안전하다. 이거는 메서드를 호출해도 리소스를 변경하지 않는다는 것이다. 예를 들면 GET메서드이다.
두 번째, 멱등이다. 메서드를 한 번, 두 번, 10번 호춮하든 결과는 언제나 똑같다는 것이다. 예를 들면, 이 역시 GET메서드이다.
세 번째, 캐시 가능이다.
HTTP STATUS
HTTP 상태코드(STATUS)는 클라이언트가 보낸 요청의 처리상태를 응답에서 알려주는 기능이다.
1XX(Informational): 100번대는 요청이 수신되어 처리중인 상태이다. 거의 사용하지 않는다고 한다.
2XX(Successful): 200번대는 요청이 정상처리 된 상태이다.
3XX(Redirection): 요청 완료하려면 추가 행동이 필요하다.
4XX(Client Error): 클라이언트 오류로, 잘못된 문법 등으로 서버가 요청을 수행할 수 없다.
5XX(Server Error): 서버 오류로, 서버가 정상요청을 처리하지 못한다.
| 2xx | 3xx | 4xx | 5xx |
|---|
| 200 Ok | 300 Multiple Choices | 400 Bad Request | 500 Internal Server Error |
| 201 Created | 301 Moved Permanently | 401 Unauthorized | 503 Service Unavailable |
| 202 Accepted | 302 Found | 403 Forbidden | |
| 204 No Content | 303 See Other | 404 Not Found | |
| 304 Not Modified | | |
| 307 Temporary Redirect | | |
| 308 Permanent Redirect | | |
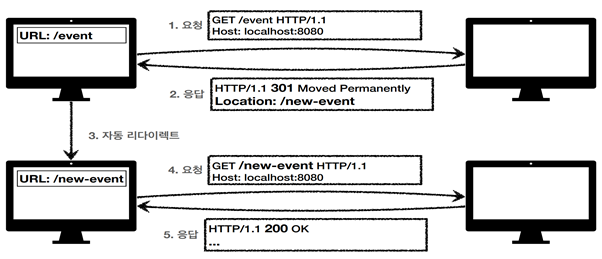
3XX 대의 상태코드 리다이렉션에 대해 이해해보자.
웹브라우저는 3xx응답 결과에 따라, Location 헤더가 있으면 그 Location 위치로 자동이동한다. 영구 리다이렉션은 특정리소스 URI로 영구이동한다.
301은 리다이렉트 후 요청 메서드로 get을 쓰며, 308은 리다이렉트 후 요청 메서드로 그 전의 메서드를 동일하게 사용한다. 일시 다이렉션은 일시적인 변경을 말한다.(ex: 301,303,307)
 <출처: 김영한 ‘모든 개발자를 위한 HTTP 웹 기본 지식’ 인프런 강의 자료>
실습
참고: 클라이언트가 html 문서를 획득하는 과정
- 웹브라우저가 설치된 클라이언트 컴퓨터 혹은 스마트폰에서 url을 통해 서버요청(https request)을 한다.
- 클라이언트로부터 https 요청 받은 서버는 정당한 요청인지 확인한다.
- 서버는 클라이언트가 요청한 웹문서가 자신에게 있는지 검색한다.
- 해당 문서를 찾으면, 서버는 응답(https response)으로 웹문서(index.html)을 보낸다.
이제 http 기초에 대해서도 알았으니, 실제로 node js로 tcp 서버와 클라이언트를 구현해보자.
소스코드가 올라간 깃허브 주소: https://github.com/insung1939/server-client/branches
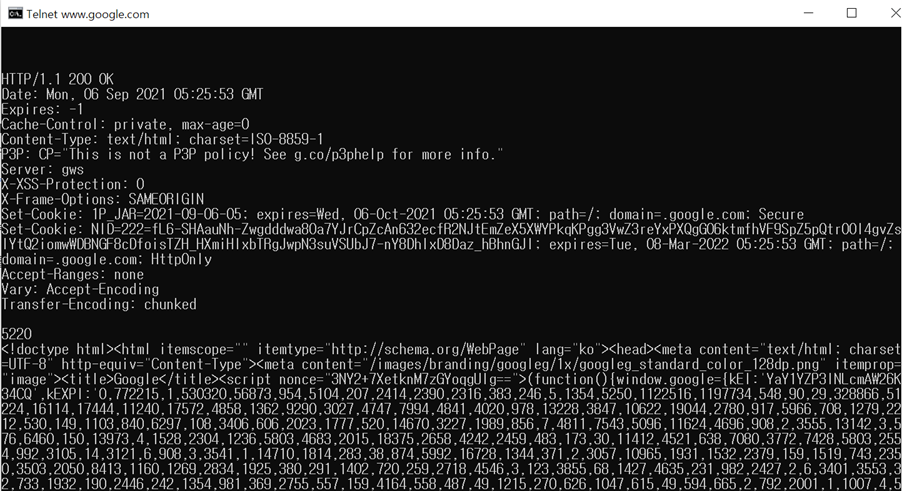
1. telnet(텔넷)
텔넷은 보통 네트워크 포트 확인용으로 많이 쓰인다. 그러나 http request도 가능하고 응답도 받을 수 있다. 보안에 취약한 이유로 윈도우 10에서는 텔넷 서비스를 기본 설정으로 비활성화한다.
제어판에서 프로그램>프로그램 및 기능> 윈도우 기능 켜기/끄기 에서 텔넷 클라이언트를 선택하면 사용 할 수 있다.
사용법: telnet ‘ip주소 혹은 DNS’ 포트번호
-> 해당 ip 포트에 접속한다.
http request 메시지를 스펙에 맞게 작성한 후 엔터 -> response를 확인할 수 있다.
<텔넷 사용예제>
//안보이는데 직접 쳐야한다ㅠㅠ
telnet www.google.com 80 (ip주소 포트번호)
GET / HTTP/1.1
Host: www.google.com
CRLF(공백)
//타이핑하는 글자가 보고 싶을 때는..?
2. Curl
curl은 오픈 소스로 개발되어 윈도우와 리눅스에 기본 설치되고 있는 웹 개발 툴이다. Curl을 사용하면 HTTP, HTTPS 등 지원되는 프로토콜 중 하나를 사용하여 데이터를 다운로드하거나 업로드할 수 있다.
curl 사용법: curl [옵션] [url]
curl https://www.naver.com ->naver.com 홈페이지의 소스코드를 보여준다.
<url의 http 헤더를 가져오기(대문자 i 임), 서버 응답의 헤더를 가져오기>
curl -I –http1.1 www.google.com/
curl -I https://www.google.com
//헤더와 바디 전부 원한다면 소문자 i 를 쓰면 된다.
3. 포스트맨(postman)
Postman은 개발한 API를 테스트하고, 테스트 결과를 공유할 수도 있다.
Gui로 http요청하고 응답 값 확인해서 테스트 가능하다.
<사용법>
-좌측 상단의 workspace로 가기.
-New 에서 http request 클릭하고 url을 입력한다.
-파리미터를 추가할 수 있으며 send를 클릭하면 response를 받을 수 있다.
]]>